MESSAGE TRANSLATIONS
Enabling Translations
To use Message Translations within your Kradle account, you must first enable translations within your Kradle settings.
- Navigate to Admin | Account Management.
- Within the Account Management blade, select the Settings tab.
- Ensure Enable Message Translation is ticked. If it isn’t, click the X symbol.
- Click the Save icon
 .
.
Selecting A Language
When creating a Group, the User will be automatically made a Group Manager.
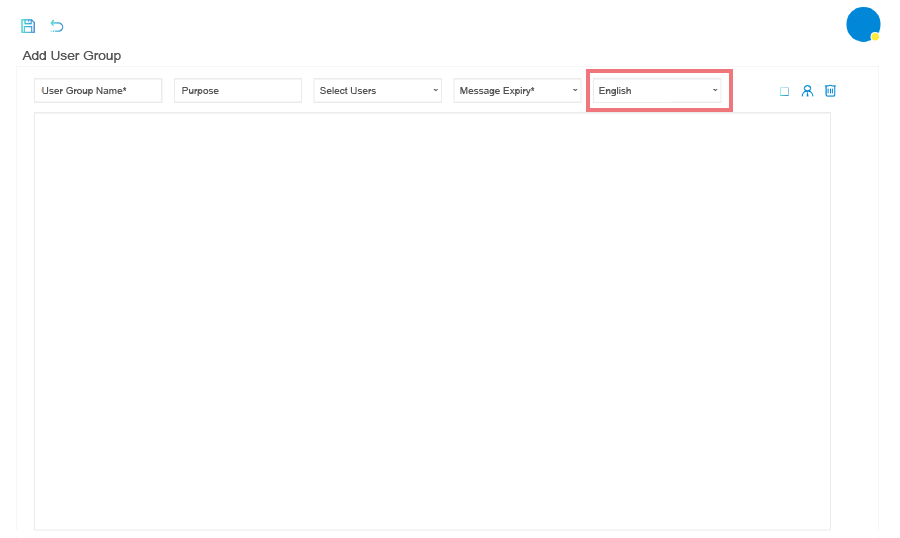
During the Add A User Group setup, the Group Manager can select the default language for the Group. This language can be later overridden by Group Managers and Group Participants to allow each User to select their desired language.
Within a Subject, Users can also toggle translations on/off depending on their requirements.
Selecting The Default Group Language
- On the Kradle menu, click the Konnect icon
 .
. - A new window will open, displaying the Kradle – Konnect interface.
- Within the Konnect navigation menu, click the Message Board icon
 .
. - Click the Add User Group icon
 .
. - Enter the details for the Group including the:
- Group Name
- Purpose of the group
- Users to invite (from a list of users within your account)
- Message expiry period (how long the messages will remain in the group before being removed)
- Language (the language to send and receive messages in)
- Click the Save icon
 .
. - Group Participants will now be emailed an invitation link requesting them to join the Group.

![]() The language selected at the Group level will apply to all Subjects created within that Group.
The language selected at the Group level will apply to all Subjects created within that Group.
Editing A Group Manager’s Language Settings
Once a Group has been created, a Group Manager can edit their own language translation settings.
- To edit, navigate to the Message Board.
- Locate the Group you wish to edit settings for, then click the Edit icon
 .
. - In the Edit User Group blade, select the language from the Language drop-down list.
- Click the Save icon
 .
.
Editing A Group Participant’s Language Settings
When a User has accepted an invitation to join a Group they can also edit their language translation settings.
- To edit, navigate to the Message Board.
- Locate the Group you wish to edit settings for, then click the Edit icon
 .
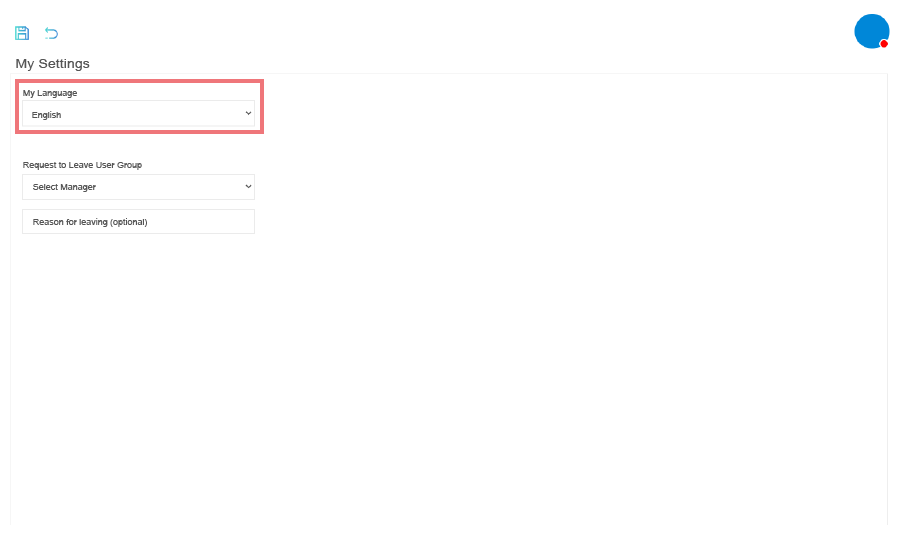
. - In the My Settings blade, select the language from the My Language drop-down list.
- Click the Save icon
 .
.

MESSAGE TRANSLATIONS
Enabling Translations
To use Message Translations within your Kradle account, you must first enable translations within your Kradle settings.
- Navigate to Admin | Account Management.
- Within the Account Management blade, select the Settings tab.
- Ensure Enable Message Translation is ticked. If it isn’t, click the X symbol.
- Click the Save icon
 .
.
Selecting A Language
When creating a Group, the User will be automatically made a Group Manager.
During the Add A User Group setup, the Group Manager can select the default language for the Group. This language can be later overridden by Group Managers and Group Participants to allow each User to select their desired language.
Within a Subject, Users can also toggle translations on/off depending on their requirements.
Selecting The Default Group Language
- On the Kradle menu, click the Konnect icon
 .
. - A new window will open, displaying the Kradle – Konnect interface.
- Within the Konnect navigation menu, click the Message Board icon
 .
. - Click the Add User Group icon
 .
. - Enter the details for the Group including the:
- Group Name
- Purpose of the group
- Users to invite (from a list of users within your account)
- Message expiry period (how long the messages will remain in the group before being removed)
- Language (the language to send and receive messages in)
- Click the Save icon
 .
. - Group Participants will now be emailed an invitation link requesting them to join the Group.

![]() The language selected at the Group level will apply to all Subjects created within that Group.
The language selected at the Group level will apply to all Subjects created within that Group.
Editing A Group Manager’s Language Settings
Once a Group has been created, a Group Manager can edit their own language translation settings.
- To edit, navigate to the Message Board.
- Locate the Group you wish to edit settings for, then click the Edit icon
 .
. - In the Edit User Group blade, select the language from the Language drop-down list.
- Click the Save icon
 .
.
Editing A Group Participant’s Language Settings
When a User has accepted an invitation to join a Group they can also edit their language translation settings.
- To edit, navigate to the Message Board.
- Locate the Group you wish to edit settings for, then click the Edit icon
 .
. - In the My Settings blade, select the language from the My Language drop-down list.
- Click the Save icon
 .
.


